Showing posts with label fabrics. Show all posts

Tuesday, 2 September 2014

Steampunk Wedding Dress - The Green Skirt

With the essential undergarments sorted (I already have a pair of bloomers and a chemise I can use), I turned my focus to the skirt and apron skirt. I’d already bought tons of cheap cotton and made a mock-up  to see approximately how much material I would need. Then I set off to get the fabrics.

I found raw silk in the perfect colours; a mossy green and a nougat brown, and bought 4 meters of each in total (later I had to run back to the store to buy another meter of the green, however, as I was running short). Raw silk is amazing to work with, light and pliable, and yet textured and crisp.

Using the deconstructed mock-up as a pattern, I cut out the pieces and started putting it all together.

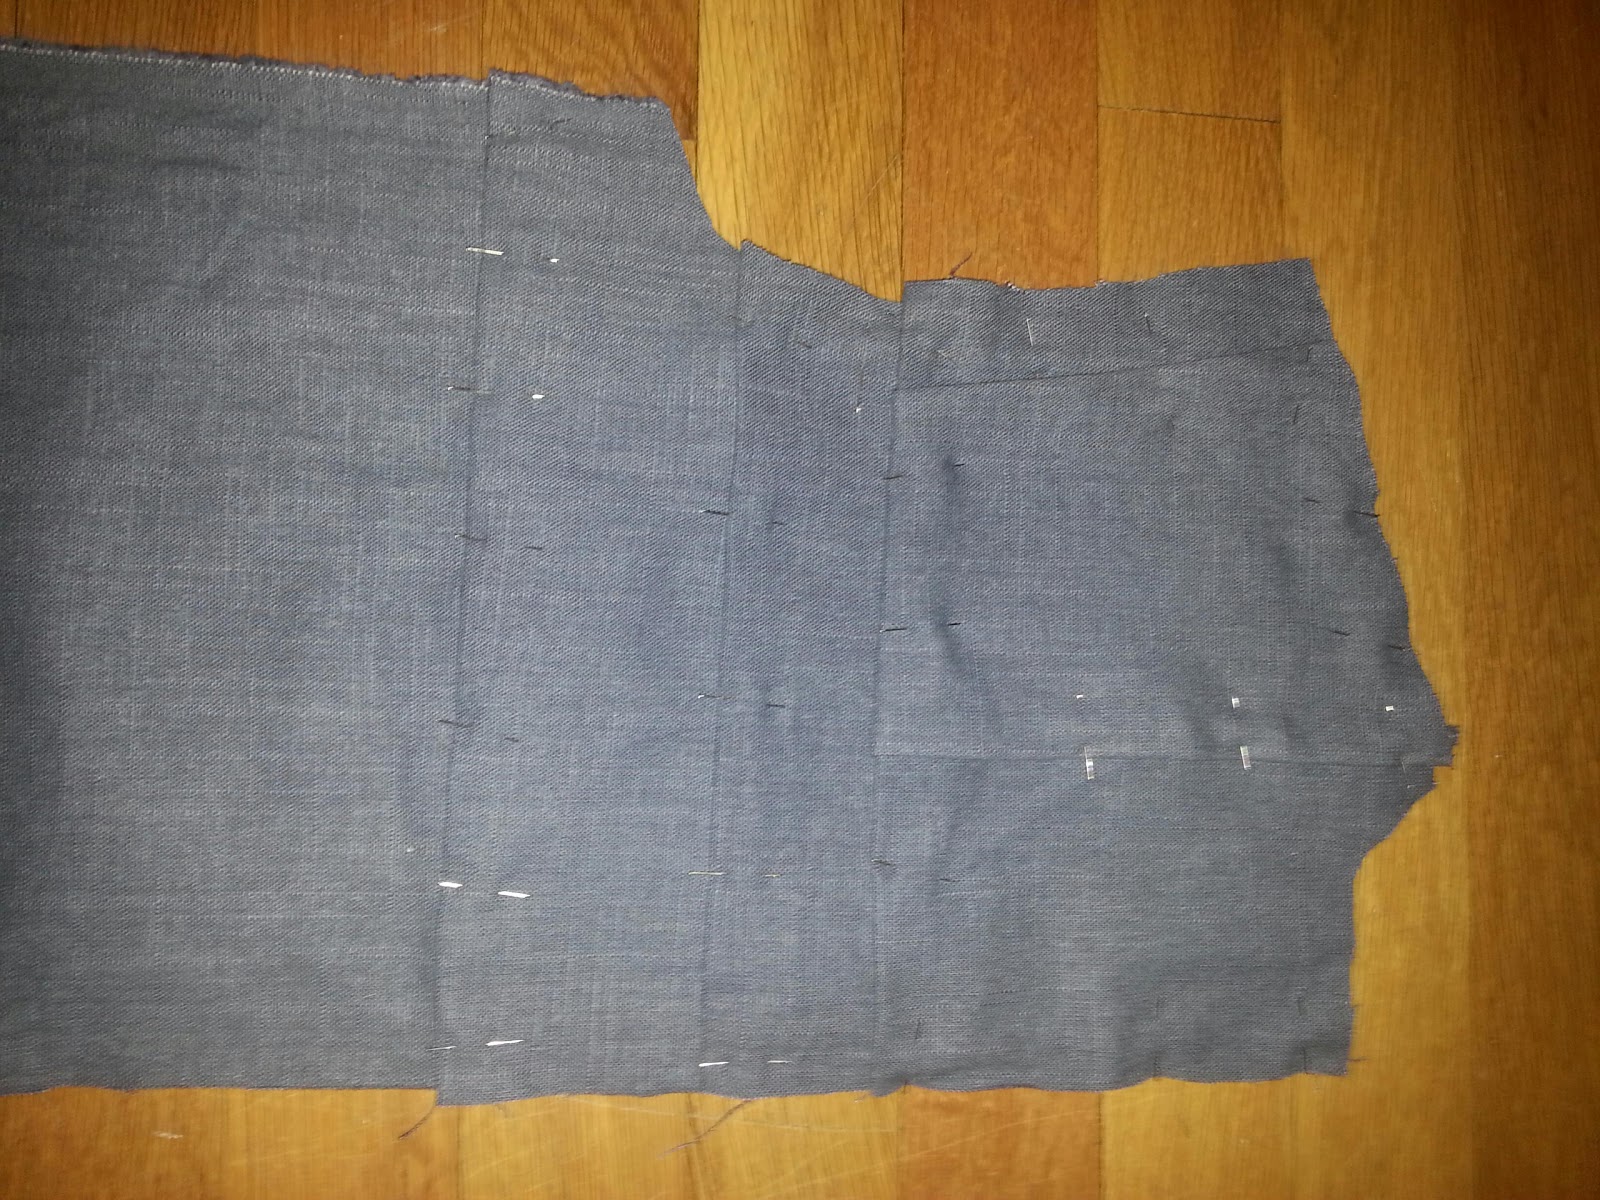
I hit a wall, however, when I was trying to decideon the best type of closure for the skirt. Should I make a side opening, like I did with the petticoat? That would mean it would be potentially visible should I choose to wear the skirt without the apron skirt over it, and it didn't really allow much room for adjustment should lose more weight. Instead I went for a different solution, (which also turned out to be very useful later) basically making a "flap" out of all the gathering in the back which can be attached to the waist band through buttoning. It's a bit difficult to explain, but on the picture below, you can see pins where I later placed the buttons (one on either end of the "flap" and one in the dead center):


Here's another picture showing the hand stiched split and the gathering before the band was sewn on:


The gathering had given me a lot of material in the back to work with and make a bit of a train, but instead of meeting the floor in a soft curve towards the floor, the excess material just rumpled up in a creased pile. I remembered how American Duchess solved this issue with the Green Acres gown, and followed suit, inserting a godet at the center as illustrated by the photos below:


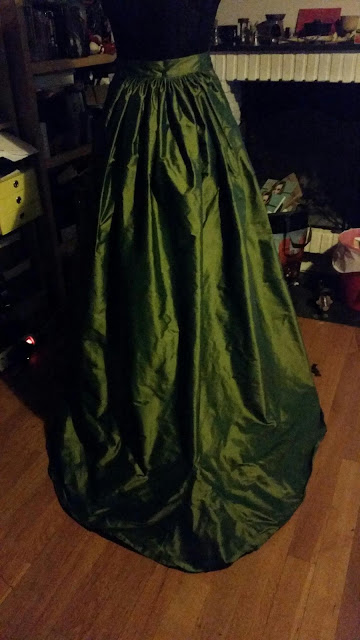
Here's a shot of the the back of the skirt after I had finished off the waist (minus the buttons) and hemmed the bottom:


Having finished the base of the skirt, it was time to move on to the ruffles! Raw silk is dreamy to work with when it comes to folding and pleating, but for all it's crispness, I still needed to stiffen the ruffles with starch to make them stay, just ironing them didn't do the job. 

Before I startched them:

After I starched them:

The difference was tremendous! With the starch the ruffles kept their sharp neatness and stayed in place. If you don't have any starch nearby, do not fret! You can do like I did and make it yourself! Just use water and corn starch, mix them together and put it all in a clean spray dispenser. :)

I'm considering a second row of ruffles (as indicated by the second chalk line, but I haven't quite decided yet.


Tuesday, 14 January 2014

Kíli Project - Boot covers and jacket

This is a long one and it's got a lot of pictures! But, first off, a tiny update on the boot covers: This is how they looked after I finished them:


Moving on, I started from scratch again with regards to Kili's jacket because the split leather was simply too thick and the suede finish just didn't work, so instead I found two pairs of leather trousers in a second hand shop and got them for a very decent price. They were so fabulously 80's - early 90's that I had to take a photo of at least one of them:


What's more, one of them had a little colourful surprise:

If this is not the worlds ugliest lining, then I don't know ...


I took the trousers apart, splitting each into four pieces, which I then shuffled about and stitched back together again to make the basis of the jacket. Once that was done, I needed to finish the trim to be able to continue, so I picked up where I left it last time and started to add the blue material to the edges:


 I realized quickly that it wouldn't look very good if I simply stitched it on, either by hand or machine, so, instead, I did a second layer of the golden zig-zag seam, only a tiny bit wider so as to fasten the blue material along with it.

Once that bit was done, I hand stitched the material to the backside so that it would look all nice and neat with no visible seams on the front.

When that was done, I started the work of fitting it onto the base of the jacket:


Having carefully pinned it to the leather, I proceeded to stitch it on by hand, and I tell you, this is a job where a thimble, a pair of hobby tongs and a lot of patience is needed!


As you can see on this photo, I decided to attach it so that the trim was sticking a bit outside the leather. This was simply because I hadn't had enough leather to get the exact width I needed, and this added the missing inch.


Because I know it's something Kili cosplayers have been discussing, I thought I'd address the matter of the trim vs. neckline issue by showing how I approached it. I went for the solution of folding the trim in on itself to make the corners, and I feel like it turned out quite nice.


Once the trim was done, there was only the matter of the gambeson sleeves left. From my research, I had found that these were only partially attached, with gaps under the arms for greater flexibility. I'd trimmed the armholes of the jacket basis with plain, black cotton trimming before I started attaching the sleeves.


 Again, thimble, tongs and patience were my friends, but I'd still say this costume is taking it's fair share of blood, sweat and tears. ;)


That's all for now! Next post, I'll be showing you how I made Kili's belt and pictures from the hair test with what was finished of the costume at that point! :)

Thursday, 5 September 2013

Kíli Project - Tunic Finished!

It's taken a lot longer than expected, but finally the blue tunic is done! It took a lot of material and lot of broken machine needles (seriously, if you're using linen and are sewing it in multiple layers, make sure you have needles meant for leather for your machine, because this stuff is tough, as in "meant to stop arrows from penetrating it"- kind of tough!), but here's the final result, modeled by my very own handsome dwarf!

 I made the lacing out of a long strip of the same linen, hand sewing it into the cord you can see on the photo.


The eyelets too are hand sewn, a painfully long process, but it looks so much better as a result.

The hood, although you can't really see it in this photo, is pleated and attached to a short, Victorian styled collar, and ends in a point at the back.

The gambeson bits on the shoulders came out looking a lot better on him, than it did on the mannequin, so I'm really pleased with that!

I'm not quite sure what I'll be focusing on next for this project, but I might just go for the boots, or in my case, boot covers. We'll see. ;)


Tuesday, 28 May 2013

Kíli Project - Tunic 0.2

Finally getting back into this project,  I've started remaking the blue tunic, this time in linen, which is far more satisfying than the dreadful cotton.

Having measured up and cut out the pieces for the front and back, , however, I realised there probably won't be enough fabric for me to do both rhe sleeves and the hood, so today will take me on yet another trip to the fabric shop. :p

This is how much I managed to do before running out of material, though:

Having learned a few lessons from the last attempt, I'm using three layers of material for the front piece, plus a fourth layer for the gambeson pieces at the shoulders. This will pad the whole thing up and give it the rigidity around the shoulders seen in this photo. It also makes sense to pad the chest area with you several layers of linen as this would serve as extra armour and protection against weapon penetration.

Also, having studied the video blog material on my precious Blue-Ray of The Hobbit, I finally found some shots of the back of the tunic, allowing me some further insight into how it's been constructed. As I'm loathe to post images on my blog that I do not have the rights to, I'll post the sketch I made from the still instead, which illustrates the extra layer on the shoulder area on the back piece:


It now looks like this:


Front piece stitched together (I know, the gambeson piece is far too small, but I cant be bothered redoing it again):


I will return to you with more updates once I have grabbed some more material and made further progress! :)

Wednesday, 8 May 2013

Etsy Shop

There's not been much progress on the Kíli front, I admit. Life and the building of a career  has come in the way, and stolen time from it, although, I promise I'll be getting back on track soon! One of the reasons taking me away from the project is my brand new Etsy shop! It's named Chameleon Candour after this blog and it's where I'll be selling stuff I make and possibly even take some commissions.

There's not really that many listings there currently, but I'm working to remedy that coming up with new ideas for products and posting new listings as they take shape. For now, it's mostly products made out of suede leather, but there may be some other materials popping up later on.

Here's some pics of some of the things I've got listed there so far:


Please pop by and have a look around! :)

Chameleon Candour

Thursday, 3 March 2011

Running a tight ship, or a shite tip....?

Busy times! Rik and I came home again from Liverpool in the late hours of Monday night with four full suitcases and a very nice civil war reenactment sword! Rik was obviously very chuffed about the latter, whilst I was (a little bit) more thrilled about the big 250 meter roll of 1/4" cotton tape and the almost two kilos of cream muslin acquired at Abakhan for next to nothing (at least compared to Norwegian prices). The woman behind the till was also rather surprised when I asked for every packet she had of medium sized self-cover buttons. I love shopping for fabrics in Liverpool! ^_^

Well back in Oslo, I'm getting closer to finishing off the stays, and it's really cutting it close now as the larp is next week. I have decided to leave the lining for when I actually have time for it, so now I'm just focusing on finishing the reed boning on the back of the left piece (the right one is done, huzza!) so that I can wrap it all up by sorting the binding out at last! I think Rik might be even more happy about me finishing them than myself, as he's constantly commenting the lack of visible proof that we do, in fact, have a kitchen table, a coffee table and, well, a flat underneath all my sewing stuff. Too bad I've still got a lot of other stuff to sew before the larp. He'll moan about it, but he'll live.

Next on the list is a shift and I'll be using the muslin for that. Then there's the burgundy jute, which will most likely become a bodice or a jacket (I've not really decided yet), and I'll be lining it with one layer of thin wool mix and then a layer of thin burgundy cotton. Also, there's Rik's trousers. I got some thin, dark grey wool for that and I'll be lining it with some plain black cotton. I've got about a week to finish it all off, and I'm probably going to end up taking a few short-cuts. But I have no ambitions of sewing any of these things by hand, so I might just make it. I've managed to sew a wedding dress in a week and a half, so it is possible. I think. Wish me luck! O_o