Showing posts with label leather. Show all posts

Wednesday, 3 September 2014

Elf Cuffs & Fantasy Stuff - An Etsy Shop Re-Launched

I've recently just re-launched my Esty Shop, "Chameleon Candour - Elf Cuffs & Fantasy Stuff"! There's not that much there yet, but there is much more to come! Here's a little look at the stuff I've made available for purchase so far:

First up, a pair of what I call "Elf Cuffs", in a rusty orange coloured wool, with wool yarn felted into the base to make a pattern:

Second, another pair of Elf Cuffs in the same type of wool, but these are decorated with crochet flowers:

Thrirdly, and lastly for now (but not for long!), is a my signature leather belt (seriously, I wear this pretty much all the time)! It's not in stock, as this is made to order, and I tailor it to fit spesific measurements:


My sewing and crafting has mainly been a hobby, but it is as costly as it is time consuming, so I've decided to start selling certain products that I've received positive feedback on, in hopes that this hobby might actually start earning me a little money as well. I won't lie, it would be a dream come true if it turned out I could partially live off running an Etsy shop!

I would therefore be beyond thankful if you, my kind readers, would pop by it, have a look around, and, if you like what you see, favorite my shop and share it with your friends! And, of course, buy things from it, if you see something you want! ^_^

http://www.chameleoncandour.etsy.com

Wednesday, 16 April 2014

Kili Project - Scabbard strap

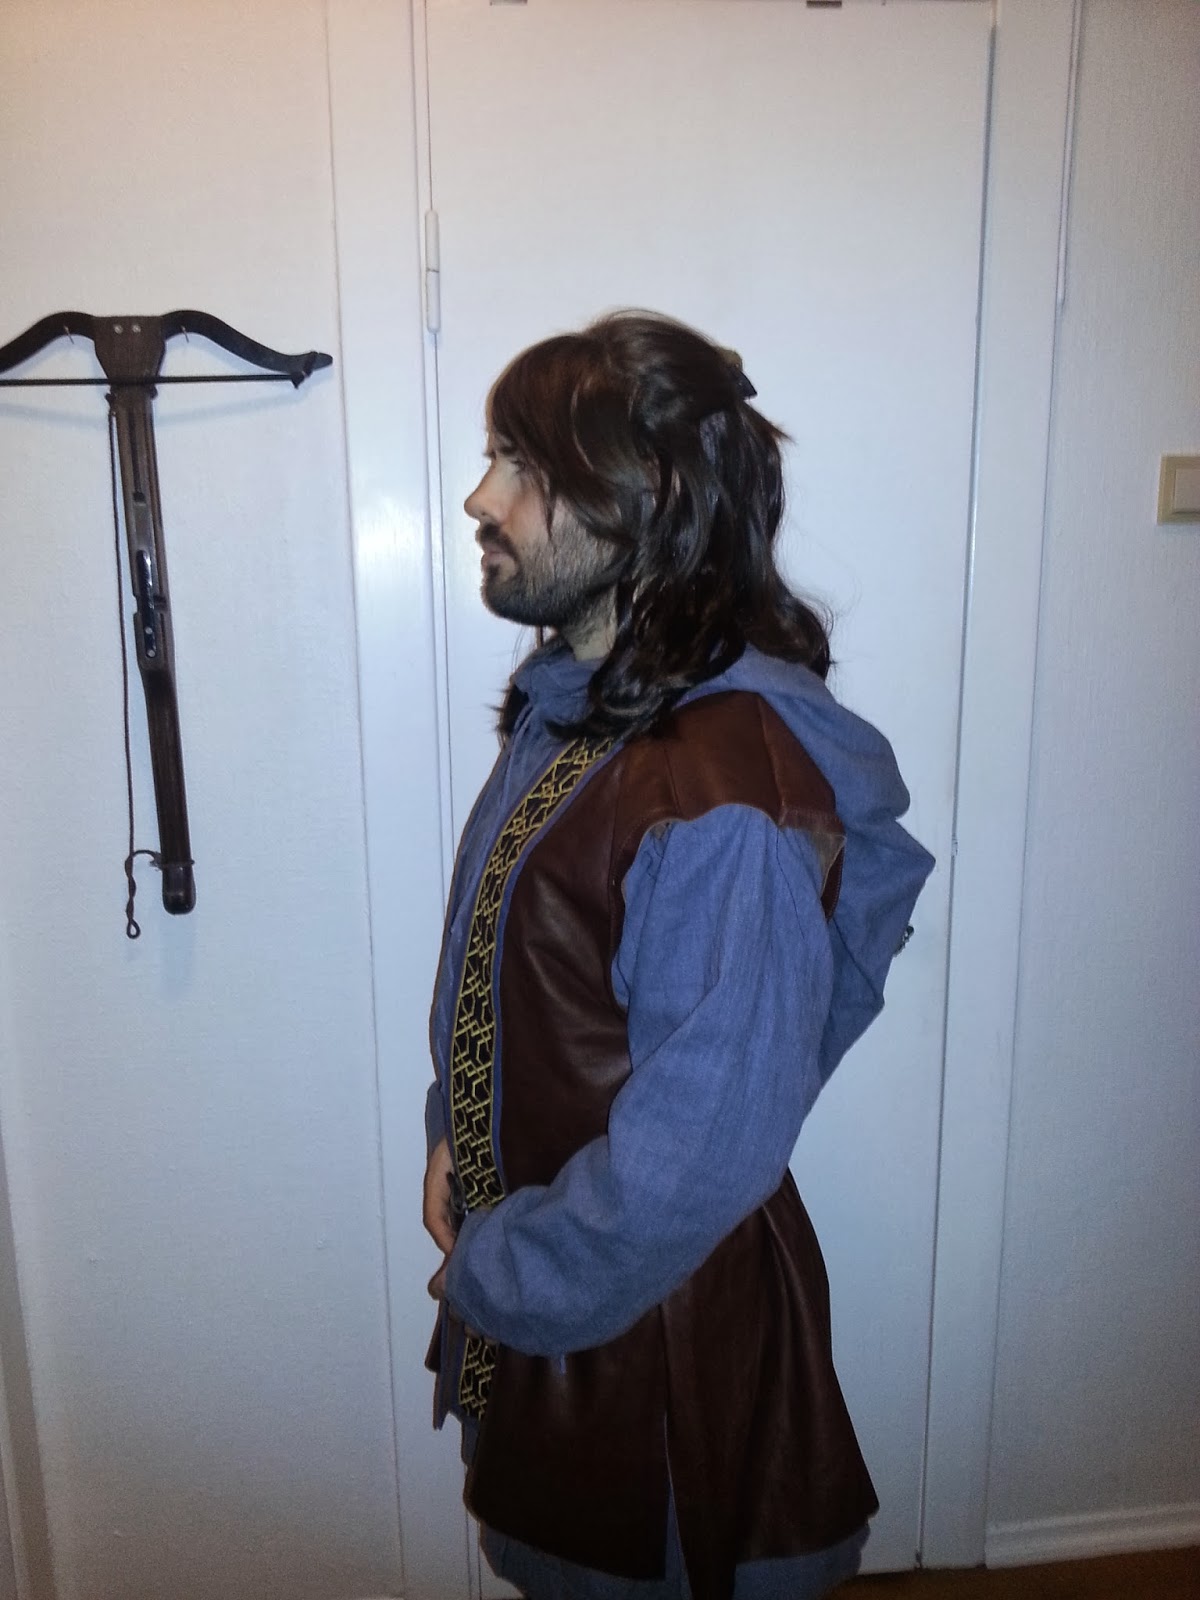
With HobbitCon just around the corner, I found out I would try on Rik's Kili costume, just for fun, to see if it actually fit, and it did! Inspired by this sudden delightful surprise, I did a quick make up and hair and realised (to Rik's horror) that I might actually make a pretty decent Kili myself! The idea formed in my head that I could actually participate in the costume competition at HobbitcCon, as Kili instead of Tauriel. As much as I love my Tauriel cosplay, I've put down a ridiculous amount of time, money and effort with the Kili costume, way beyond what I've done with Tauriel, and it would be amazing to be able to showcase that work through a competition (especially if the rumors are true and Richard Taylor (yes, THE Richard Taylor of Weta Workshop) IS in the judge panel). Therefore, after putting it down to a vote on my Instagram and Facebook account, Kili won through with way over half the votes!

Great! This will be awesome! At least that's what I thought a first. And then my compulsions kicked in ...

"I'll have to make the coat now! I don't have time for that ... But I can make the quiver/sword strap! I have time for that! And maybe the bracers? I could have time for that (possibly) ... And the gloves? That's pushing it."

As you can see, I have a nasty tendency of getting in over my head, but at least I've gotten better at calling myself out on it. I made the strap. Well, technically, I'd already made the strap, as a scabbard for the sword for the premiere, but it was just a simple leather strap, no embellishments, so I modified it look like the one in the movie. I might make the bracers if I have time tonight. Possibly.
Anyway, here's progress photos! And me as Kili! ^_^

Making more studs out of fimo clay:

Drilling holes in the corners of the studs for sewing, oh, and the buckle:
Gluing the studs and the leather pieces onto the strap:
Putting on the overlaying leather that attaches the buckle to the strap and gluing that too on:

Getting an idea of how it's gonna look before securing the studs by sewing the corners to the leather:

The finished product (I apologize for the messy background, I'm messy, I know, Rik keeps telling me off for it):

Me as Kili:

Thursday, 3 April 2014

Tauriel Bodice

After I had stitched together the leather pieces as demonstrated in my last post, I also did the lining and attached some channels for boning to the latter. Using thin spiral steel boning gives the bodice the rigidity it needs, and yet allows it to remain flexible enough for comfort.

I sewed together the leather and the lining and proceeded to sort out the lacing in the back, inserting boning at the end piece and then eyelets for the lacing. Only to realize I'd made the whole thing a bit too wide; even lacing it all the way in, it looked and felt slack, so I had to do some cheating on the back panels to get rid of a couple of inches. That worked a treat!

Moving on from here, I started to work on the "winged" sweetheart neckline and straps. This was a fiddly process, but I got it right in the end, with the help of some pegs (!), and now, all that remains is to attach the two last bits on the straps, and then attach the latter in back!


Monday, 24 March 2014

Tauriel - Bodice progress

Using one of the two leather coats I originally bought for the Kili project, I started cutting out the pieces for the new bodice. I also made an extra set in a thick cotton and polyester mix material for lining. Pinning them together, I sewed them together:


It then ended up looking a bit like this. Now, I know the original doesn't have a seam in the middle of the front panel, but I was running out leather and had to compromise.


Having stitched it all together, it looked like this. I'm currently working on boning and the lining, so there will be a new update as soon as I've got that fitted. :)


Sunday, 19 January 2014

Kíli Project - Belt and Hair

Kili's belt. This is one part of this project that I've been dreading and putting off for, like, forever. Not only does it involve having to do a shit ton of hand stitching, it's hand stitching thick leather, and I also have to make all the studs that are to be stitched on. I already had the old belt I'd be converting into this magnificently vicious little number, and removed the original belt buckle a while back, so I started where I had to; making the studs. I'd already made one as a prototype, if you will, but now, I would have to mass produce them as I needed somewhere in the vicinity of 25 of them. Nothin' to it but to do it. Equipped with my favourite biscuits, my faithful Aperture Science mug filled to the brim with coffee and milk and other useful tools, I dived in and got it done!

From there, the path of hellfire lay before me, also known as hand sewing leather. It hurts you wrists, it hurts you neck (because you inevitably end up sitting with you neck craned over whatever you're working on) and it hurts your fingers, sometimes quite a lot, because there are moments when you can't use the thimble, and that's when it strikes, the unexpected needle puncture in you index finger tip, for the umpteenth time. Ok, I'm done ranting now.

The belt buckle was the easy bit. I could just sew that through the holes already there from where the old belt buckle had been attached. The nightmare was all those bloody studs that needed to be stuck onto this leash of doom. I did this by drilling little holes (using a mini drill my fella uses for wargaming miniatures) into each inner corner of each stud, so that I'd have some way of sewing them on. Then I put some glue and stuck it onto the leather. From there, I drilled through the leather as well, so as to spare my hands a little bit. Then the actual sewing began, stitching each corner so that the thread would lie firmly in the grooves on either side of the corner. Repeat 20 something times. You could say I was very relieved and quite pleased with myself once it was done.


Since I had the fimo clay out already from making the studs, I figured I might as well make Kili's hair clip, or at least my version of it. I'd seen one version someone had made of it, and I liked the pattern they'd used, and although I had no idea if it's screen accurate or not (still don't), I decided to use it. I was very happy with how it turned out, and the fact that it's actually functional. :)


Having received the hair extensions for my fella earlier (his hair was getting rather long but it wasn't long enough, thus extensions), I cut them to the right length and had the poor chap sit down to get have them put in. (He wasn't all too pleased, but as usual, the promise of a brew made him more co-operative.) I must say that the result was perfect, in my opinion, and you could hardly tell which bit was extensions and which bit was his own hair.

This  all happened after having attached the trim onto the leather jacket, but before I stitched the gambeson sleeves on, so here are some photos of how it looked on along with the hair:


Tuesday, 14 January 2014

Kíli Project - Boot covers and jacket

This is a long one and it's got a lot of pictures! But, first off, a tiny update on the boot covers: This is how they looked after I finished them:


Moving on, I started from scratch again with regards to Kili's jacket because the split leather was simply too thick and the suede finish just didn't work, so instead I found two pairs of leather trousers in a second hand shop and got them for a very decent price. They were so fabulously 80's - early 90's that I had to take a photo of at least one of them:


What's more, one of them had a little colourful surprise:

If this is not the worlds ugliest lining, then I don't know ...


I took the trousers apart, splitting each into four pieces, which I then shuffled about and stitched back together again to make the basis of the jacket. Once that was done, I needed to finish the trim to be able to continue, so I picked up where I left it last time and started to add the blue material to the edges:


 I realized quickly that it wouldn't look very good if I simply stitched it on, either by hand or machine, so, instead, I did a second layer of the golden zig-zag seam, only a tiny bit wider so as to fasten the blue material along with it.

Once that bit was done, I hand stitched the material to the backside so that it would look all nice and neat with no visible seams on the front.

When that was done, I started the work of fitting it onto the base of the jacket:


Having carefully pinned it to the leather, I proceeded to stitch it on by hand, and I tell you, this is a job where a thimble, a pair of hobby tongs and a lot of patience is needed!


As you can see on this photo, I decided to attach it so that the trim was sticking a bit outside the leather. This was simply because I hadn't had enough leather to get the exact width I needed, and this added the missing inch.


Because I know it's something Kili cosplayers have been discussing, I thought I'd address the matter of the trim vs. neckline issue by showing how I approached it. I went for the solution of folding the trim in on itself to make the corners, and I feel like it turned out quite nice.


Once the trim was done, there was only the matter of the gambeson sleeves left. From my research, I had found that these were only partially attached, with gaps under the arms for greater flexibility. I'd trimmed the armholes of the jacket basis with plain, black cotton trimming before I started attaching the sleeves.


 Again, thimble, tongs and patience were my friends, but I'd still say this costume is taking it's fair share of blood, sweat and tears. ;)


That's all for now! Next post, I'll be showing you how I made Kili's belt and pictures from the hair test with what was finished of the costume at that point! :)

Friday, 10 January 2014

Side project: Tauriel - part 2

Before I went back to the sewing, I decided to sit down and make Tauriel's pendant with Fimo clay. It was a fairly easy task and didn't take long, leaving room to make the bracers as well. Here's how they turned out:


Having finished the little bits and bobs, I finally returned to the green jacket to fix the collar and front opening. I made the collar, then cut the neckline before attaching it. Here's how it turned out:


I fixed the front opening by sewing on little hook and eye fastenings all the way down the front, but I don't really have any good photos of it.

After all the seams were sewn, the costume was pretty much done. I'd bought some nice boots some months earlier and had decided to just wear some brown cotton leggings (mainly because it meant I could wear warm thermals underneath to shield me from the Norwegian winter cold), so I couldn't resist trying it all on, even if I didn't have the full hair and make-up!


I took a couple of selfies, but the lighting wouldn't really show off the full costume, so I bribed my fella with a cup of tea and had him take some full figure photos where you can actually see the skirt and the boots as well. :)